用 150 行 Python 代码构建全文搜索引擎
总结:全文搜索无处不在,但很少有人真正了解它的底层原理。这篇文章从零开始,用不到 150 行 Python 代码实现了一个完整的全文搜索引擎,涵盖数据解析、倒排索引构建、文本分析、布尔搜索以及 TF-IDF 相关性排序。读者可以从中掌握搜索引擎的核心工作机制,并亲手体验如何在笔记本电脑上实现对 627 万篇文档的毫秒级检索与排序。对于想深入理解信息检索基础的开发者来说,这是一个极佳的实践入门。
全文搜索(Full-text Search)无处不在。从在 Scribd 上找一本书、在 Netflix 上找一部电影、在 Amazon 上找卫生纸,到通过 Google 搜索网上的一切(比如如何做好一个软件工程师),你今天已经多次搜索了海量的非结构化数据。更令人惊叹的是,即使你搜索了数百万(甚至数十亿)条记录,也能在毫秒内得到响应。在这篇文章中,我们将探索全文搜索引擎的基本组件,并用它们构建一个能够在毫秒内搜索数百万文档并按相关性排序的搜索引擎——代码不超过 150 行 Python!
数据
本文中的所有代码都可以在 Github 上找到。我会在代码片段旁提供链接,方便你自己尝试运行。你可以通过安装依赖(pip install -r requirements.txt)并运行 python run.py 来执行完整示例。这会下载所有数据,并分别执行带排序和不带排序的示例查询。
在开始构建搜索引擎之前,我们首先需要一些全文非结构化数据来搜索。我们将使用英文维基百科的文章摘要,它是一个约 785MB 的 gzip 压缩 XML 文件,包含大约 627 万条摘要1。我写了一个简单的下载函数来获取这个 gzip XML 文件,你也可以手动下载。
数据准备
这个文件是一个大型 XML 文件,包含所有摘要。每条摘要被包裹在一个 <doc> 元素中,大致如下(省略了我们不感兴趣的元素):
<doc>
    <title>Wikipedia: London Beer Flood</title>
    <url>https://en.wikipedia.org/wiki/London_Beer_Flood</url>
    <abstract>The London Beer Flood was an accident at Meux & Co's Horse Shoe Brewery, London, on 17 October 1814. It took place when one of the  wooden vats of fermenting porter burst.</abstract>
    ...
</doc>
我们感兴趣的是 title、url 和 abstract 文本本身。我们用 Python 的 dataclass 来表示文档,以便于数据访问。同时添加一个属性,将标题和摘要内容拼接起来。代码可以在这里找到。
from dataclasses import dataclass

@dataclass
class Abstract:
    """Wikipedia abstract"""
    ID: int
    title: str
    abstract: str
    url: str

    @property
    def fulltext(self):
        return ' '.join([self.title, self.abstract])
接下来,我们需要从 XML 中提取摘要数据并解析,以便创建 Abstract 对象的实例。我们将以流式方式处理 gzip 压缩的 XML,而不是先将整个文件加载到内存中2。我们按加载顺序为每个文档分配一个 ID(即第一个文档的 ID=1,第二个的 ID=2,以此类推)。代码可以在这里找到。
import gzip
from lxml import etree

from search.documents import Abstract

def load_documents():
    with gzip.open('data/enwiki.latest-abstract.xml.gz', 'rb') as f:
        doc_id = 1
        for _, element in etree.iterparse(f, events=('end',), tag='doc'):
            title = element.findtext('./title')
            url = element.findtext('./url')
            abstract = element.findtext('./abstract')

            yield Abstract(ID=doc_id, title=title, url=url, abstract=abstract)

            doc_id += 1
            element.clear()
索引
我们将把数据存储在一种叫做「倒排索引(Inverted Index)」或「倒排列表(Postings List)」的数据结构中。你可以把它想象成书后面的索引——按字母顺序列出相关的词汇和概念,并标注读者可以在哪一页找到它们。
实际上,这意味着我们要创建一个字典,将语料库中的所有单词映射到包含它们的文档 ID。它看起来大致如下:
{
    ...
    "london": [5245250, 2623812, 133455, 3672401, ...],
    "beer": [1921376, 4411744, 684389, 2019685, ...],
    "flood": [3772355, 2895814, 3461065, 5132238, ...],
    ...
}
注意上面示例中字典里的单词都是小写的;在构建索引之前,我们需要对原始文本进行「分析(Analyze)」,将其拆解为一个个单词或「词元(Token)」。核心思路是:先将文本「分词(Tokenize)」为单个词,然后对每个词元应用零个或多个「过滤器(Filter)」(如转小写或词干提取),以提高查询与文本匹配的概率。
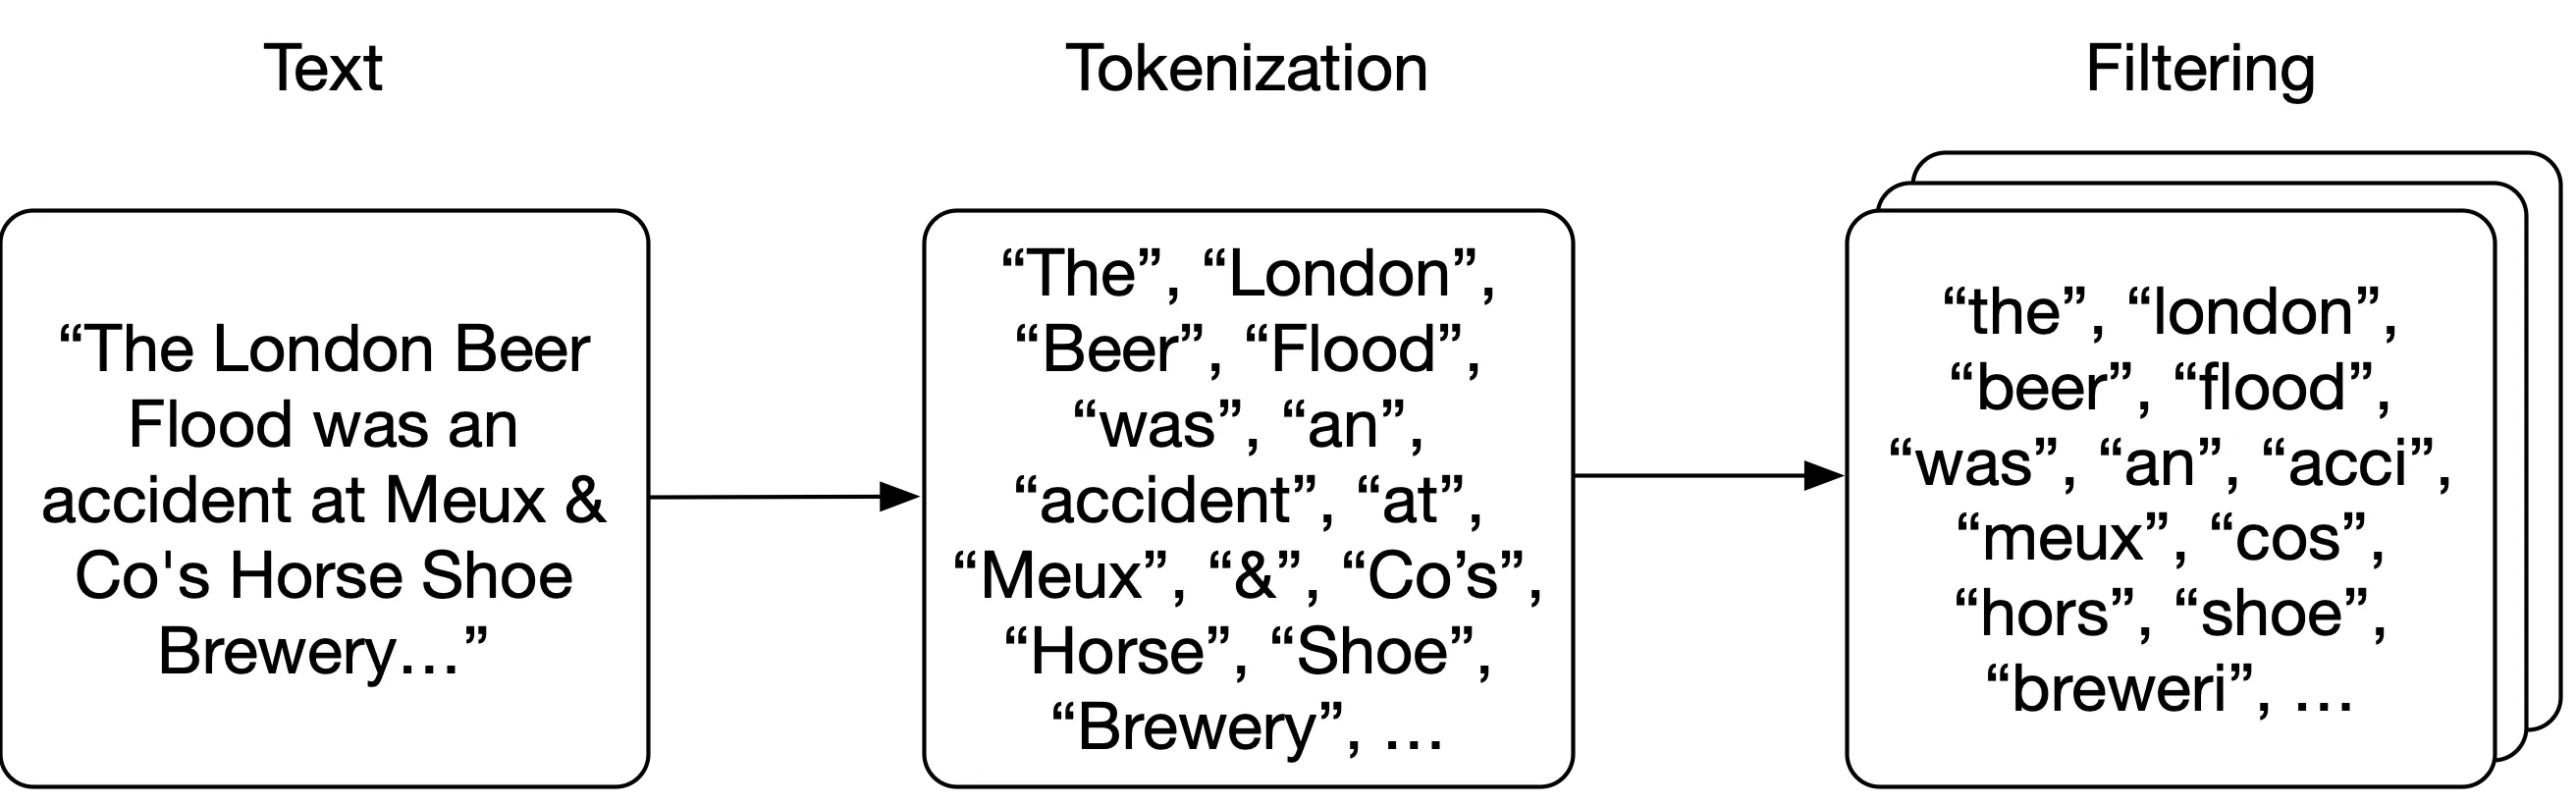
分析
我们将采用非常简单的分词方式——按空格拆分文本。然后对每个词元依次应用以下过滤器:转为小写、移除标点符号、移除英语中最常见的 25 个单词(以及 “wikipedia”,因为它出现在每篇摘要的标题中),并对每个单词进行词干提取(Stemming)(确保一个词的不同形式映射到相同的词干,比如 brewery 和 breweries3)。
分词和小写转换过滤器非常简单:
import Stemmer

STEMMER = Stemmer.Stemmer('english')

def tokenize(text):
    return text.split()

def lowercase_filter(tokens):
    return [token.lower() for token in tokens]

def stem_filter(tokens):
    return STEMMER.stemWords(tokens)
标点符号处理只是一个基于标点符号集合的正则表达式:
import re
import string

PUNCTUATION = re.compile('[%s]' % re.escape(string.punctuation))

def punctuation_filter(tokens):
    return [PUNCTUATION.sub('', token) for token in tokens]
停用词(Stopword)是非常常见的词,我们预期它们会出现在语料库中的(几乎)每一个文档里。因此,搜索这些词对结果没有太大贡献(即几乎每个文档都会匹配),而且只会占用空间,所以我们在索引时就将它们过滤掉。维基百科摘要语料库中每个标题都包含 “Wikipedia” 这个词,所以我们也将它加入停用词列表。我们过滤掉英语中最常见的 25 个词。
# 英语中最常见的 25 个词加上 "wikipedia":
# https://en.wikipedia.org/wiki/Most_common_words_in_English
STOPWORDS = set(['the', 'be', 'to', 'of', 'and', 'a', 'in', 'that', 'have',
                 'I', 'it', 'for', 'not', 'on', 'with', 'he', 'as', 'you',
                 'do', 'at', 'this', 'but', 'his', 'by', 'from', 'wikipedia'])

def stopword_filter(tokens):
    return [token for token in tokens if token not in STOPWORDS]
将所有过滤器组合起来,我们构建一个 analyze 函数,它对每条摘要的 text 执行操作——先将文本分词为单独的词(更准确地说是「词元」),然后依次对词元列表应用每个过滤器。顺序很重要,因为我们使用的是未经词干处理的停用词列表,所以需要在 stem_filter 之前应用 stopword_filter。
def analyze(text):
    tokens = tokenize(text)
    tokens = lowercase_filter(tokens)
    tokens = punctuation_filter(tokens)
    tokens = stopword_filter(tokens)
    tokens = stem_filter(tokens)

    return [token for token in tokens if token]
索引语料库
我们创建一个 Index 类来存储 index(索引)和 documents(文档)。documents 字典按 ID 存储 dataclass,index 的键是词元,值是该词元所出现的文档 ID 集合:
class Index:
    def __init__(self):
        self.index = {}
        self.documents = {}

    def index_document(self, document):
        if document.ID not in self.documents:
            self.documents[document.ID] = document

        for token in analyze(document.fulltext):
            if token not in self.index:
                self.index[token] = set()
            self.index[token].add(document.ID)
搜索
现在所有词元都已建好索引,搜索查询就变成了用相同的分析器对查询文本进行处理——这样我们得到的词元就能与索引中的词元匹配。对于每个词元,我们在字典中查找包含它的文档 ID。对所有词元都执行此操作,然后找到所有这些集合的交集(即一个文档必须包含查询中的所有词元才算匹配)。最后用得到的文档 ID 列表从 documents 存储中获取实际数据4。
def _results(self, analyzed_query):
    return [self.index.get(token, set()) for token in analyzed_query]

def search(self, query):
    """
    Boolean search; this will return documents that contain all words from the
    query, but not rank them (sets are fast, but unordered).
    """
    analyzed_query = analyze(query)
    results = self._results(analyzed_query)
    documents = [self.documents[doc_id] for doc_id in set.intersection(*results)]

    return documents
In [1]: index.search('London Beer Flood')
search took 0.16307830810546875 milliseconds
Out[1]:
[Abstract(ID=1501027, title='Wikipedia: Horse Shoe Brewery', abstract='The Horse Shoe Brewery was an English brewery in the City of Westminster that was established in 1764 and became a major producer of porter, from 1809 as Henry Meux & Co. It was the site of the London Beer Flood in 1814, which killed eight people after a porter vat burst.', url='https://en.wikipedia.org/wiki/Horse_Shoe_Brewery'),
Abstract(ID=1828015, title='Wikipedia: London Beer Flood', abstract="The London Beer Flood was an accident at Meux & Co's Horse Shoe Brewery, London, on 17 October 1814. It took place when one of the wooden vats of fermenting porter burst.", url='https://en.wikipedia.org/wiki/London_Beer_Flood')]这种方式会让查询非常精确,尤其是对于较长的查询字符串(查询包含的词元越多,能同时包含所有这些词元的文档就越少)。我们可以通过允许用户指定只需匹配一个词元就算命中,来优化搜索函数的召回率(Recall)而非精确率(Precision):
def search(self, query, search_type='AND'):
    """
    Still boolean search; this will return documents that contain either all words
    from the query or just one of them, depending on the search_type specified.

    We are still not ranking the results (sets are fast, but unordered).
    """
    if search_type not in ('AND', 'OR'):
        return []

    analyzed_query = analyze(query)
    results = self._results(analyzed_query)
    if search_type == 'AND':
        # all tokens must be in the document
        documents = [self.documents[doc_id] for doc_id in set.intersection(*results)]
    if search_type == 'OR':
        # only one token has to be in the document
        documents = [self.documents[doc_id] for doc_id in set.union(*results)]

    return documents
In [2]: index.search('London Beer Flood', search_type='OR')
search took 0.02816295623779297 seconds
Out[2]:
[Abstract(ID=5505026, title='Wikipedia: Addie Pryor', abstract='| birth_place = London, England', url='https://en.wikipedia.org/wiki/Addie_Pryor'),
Abstract(ID=1572868, title='Wikipedia: Tim Steward', abstract='|birth_place = London, United Kingdom', url='https://en.wikipedia.org/wiki/Tim_Steward'),
Abstract(ID=5111814, title='Wikipedia: 1877 Birthday Honours', abstract='The 1877 Birthday Honours were appointments by Queen Victoria to various orders and honours to reward and highlight good works by citizens of the British Empire. The appointments were made to celebrate the official birthday of the Queen, and were published in The London Gazette on 30 May and 2 June 1877.', url='https://en.wikipedia.org/wiki/1877_Birthday_Honours'),
...
In [3]: len(index.search('London Beer Flood', search_type='OR'))
search took 0.029065370559692383 seconds
Out[3]: 49627相关性
我们已经用基础 Python 实现了一个相当快的搜索引擎,但有一个关键方面明显缺失——相关性(Relevance)。目前我们只是返回一个无序的文档列表,让用户自己去判断哪些是真正需要的。对于大结果集来说,这是痛苦甚至不可能的(在我们的 OR 示例中,有近 50,000 条结果)。
这就是相关性的作用:如果我们能给每个文档分配一个分数,表示它与查询的匹配程度,然后按分数排序呢?一种简单朴素的评分方式是统计文档中提到某个词的次数。毕竟,文档提到该词的次数越多,它就越可能与我们的查询相关!
词频
让我们扩展 Abstract dataclass,在索引时计算并存储词频(Term Frequency)。这样在需要对无序文档列表进行排序时,就能方便地获取这些数据:
# in documents.py
from collections import Counter
from .analysis import analyze

@dataclass
class Abstract:
    # snip
    def analyze(self):
        self.term_frequencies = Counter(analyze(self.fulltext))

    def term_frequency(self, term):
        return self.term_frequencies.get(term, 0)
我们需要确保在索引数据时生成这些频率计数:
# in index.py we add `document.analyze()

def index_document(self, document):
    if document.ID not in self.documents:
        self.documents[document.ID] = document
        document.analyze()
然后修改搜索函数,对结果集中的文档应用排序。我们用同样的布尔查询从索引和文档存储中获取文档,然后对结果集中的每个文档,简单地累加每个词元在该文档中的出现次数作为得分:
def search(self, query, search_type='AND', rank=True):
    # snip
    if rank:
        return self.rank(analyzed_query, documents)
    return documents


def rank(self, analyzed_query, documents):
    results = []
    if not documents:
        return results
    for document in documents:
        score = sum([document.term_frequency(token) for token in analyzed_query])
        results.append((document, score))
    return sorted(results, key=lambda doc: doc[1], reverse=True)
逆文档频率
这已经好很多了,但仍有一些明显的不足。我们将所有查询词元视为同等重要,但实际上某些词元在判断相关性时几乎没有区分能力。例如,在一个包含大量啤酒相关文档的集合中,“beer” 这个词几乎会出现在每个文档里(事实上,我们已经通过去除英语中最常见的 25 个词来尝试解决这个问题)。在这种情况下搜索 “beer” 基本等同于随机排序。
为了解决这个问题,我们引入一个新的评分组件,来降低那些在索引中频繁出现的词对最终得分的贡献。我们可以使用词的「集合频率(Collection Frequency)」(即该词在所有文档中的总出现次数),但实践中通常使用「文档频率(Document Frequency)」(即索引中有多少个文档包含该词)。毕竟我们的目标是对文档排序,使用文档级别的统计量更合理。
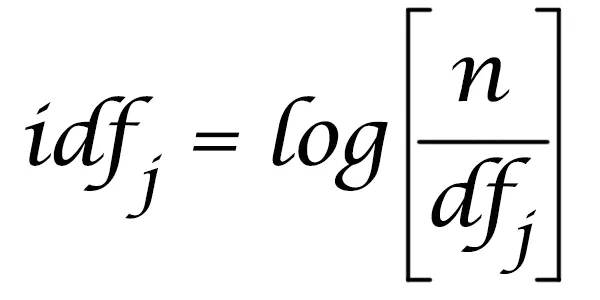
我们通过将索引中的文档总数(N)除以包含该词元的文档数量,再取对数,来计算逆文档频率(Inverse Document Frequency,IDF)。
然后在排序时,简单地将词频乘以逆文档频率——这样对语料库中稀有词元的匹配会对相关性得分贡献更多5。我们可以很容易地从索引中已有的数据计算逆文档频率:
# index.py
import math

def document_frequency(self, token):
    return len(self.index.get(token, set()))

def inverse_document_frequency(self, token):
    # Manning, Hinrich and Schütze use log10, so we do too, even though it
    # doesn't really matter which log we use anyway
    # https://nlp.stanford.edu/IR-book/html/htmledition/inverse-document-frequency-1.html
    return math.log10(len(self.documents) / self.document_frequency(token))

def rank(self, analyzed_query, documents):
    results = []
    if not documents:
        return results
    for document in documents:
        score = 0.0
        for token in analyzed_query:
            tf = document.term_frequency(token)
            idf = self.inverse_document_frequency(token)
            score += tf * idf
        results.append((document, score))
    return sorted(results, key=lambda doc: doc[1], reverse=True)
未来工作
这就是一个仅用几行 Python 代码实现的基础搜索引擎!你可以在 Github 上找到所有代码,我还提供了一个工具函数来下载维基百科摘要并构建索引。安装好依赖,在你喜欢的 Python 控制台中运行它,尽情探索数据结构和搜索功能吧。
显然,这个项目只是为了说明搜索的概念以及它为什么能如此之快(即使带排序,我也能在笔记本电脑上用 Python 这种”慢”语言搜索并排序 627 万篇文档),并非生产级软件。它完全在我的笔记本内存中运行,而像 Lucene 这样的库利用了超高效的数据结构甚至优化了磁盘寻道,Elasticsearch 和 Solr 等软件则将 Lucene 扩展到数百甚至数千台机器上。
但这并不意味着我们不能思考一些有趣的扩展方向。例如,目前我们假设文档中每个字段对相关性的贡献相同,但标题中的查询词匹配可能应该比描述中的匹配权重更高。另一个有趣的项目是扩展查询解析——没有理由只能全部匹配或任一匹配。为什么不支持排除某些词、或在各个词之间使用 AND 和 OR 呢?我们能否将索引持久化到磁盘,使其突破笔记本 RAM 的限制?
本文翻译自:Building a full-text search engine in 150 lines of Python code
Footnotes
-
摘要通常是维基百科文章的第一段或前几句话。完整数据集目前约为 796MB 的 gzip 压缩 XML。如果你想自己实验和修改代码,有包含文章子集的较小数据集可用;不过解析 XML 和建索引需要一些时间,也需要相当大的内存。 ↩
-
虽然最终我们还是会将整个数据集和索引放在内存中,但至少可以跳过将原始数据保留在内存中这一步。 ↩
-
词干提取是否是一个好主意仍有争议。它会减少索引的总大小(即更少的唯一词),但词干提取基于启发式规则——我们丢弃的信息可能很有价值。例如,
university、universal、universities和universe这些词都会被提取为univers。我们失去了区分这些词含义的能力,这会对相关性产生负面影响。关于词干提取(和词形还原)的更详细文章,请阅读这篇优秀的文章。 ↩ -
我们这里显然只是使用笔记本的 RAM,但在实践中,不将实际数据存储在索引中是很常见的做法。Elasticsearch 将数据以普通 JSON 的形式存储在磁盘上,只在 Lucene(底层搜索和索引库)中存储索引数据。许多其他搜索引擎也只返回排序后的文档 ID 列表,然后用这些 ID 从数据库或其他服务中检索要展示给用户的数据。这对于大规模语料库尤其重要——对所有数据做全量重建索引的代价很高,你通常只希望在搜索引擎中存储与相关性有关的数据(而非仅用于展示的属性)。 ↩
-
关于该算法的更深入介绍,推荐阅读 https://monkeylearn.com/blog/what-is-tf-idf/ 和 https://nlp.stanford.edu/IR-book/html/htmledition/term-frequency-and-weighting-1.html。 ↩